High Point Central HS 3D Modeling, Animation and Game Design
The 3ds Max interface looks very complicated the first time you see it. That's because it is. There are many, many layers to this program that have specific functions dealing with all facets of CGI - Modeling, Texturing, Lighting, Rigging, Animation, Simulation and Scene Composition. Most people in the CG industry specialize in one area or another. The good news is that you don't have to be an expert in all of these areas. But, you should at least be familiar with each of them. In this course, we will introduce you to most of these areas.
3ds Max, like most modern software, makes use of just about every form of graphical interface device there is. Before we go into the interface in detail, let's define some of these devices, so that when I tell you to look in "the Command Panel, under the Modify Tab for the Soft Selection rollout" you'll know what I'm talking about.
Look at the picture on the right (below on an iPad or phone). This is the Soft Selection rollout from the Modify Tab, in the Command Panel. It contains open and closed rollouts, spinners, checkboxes, buttons and groups. Let's identify each part.
- The two rollouts in this picture are titled Selection and Soft Selection (colored green). Selection is closed and Soft Selection is open. If you click on the plus sign, you will open a rollout. If you click on the minus sign, you will close it.
- There are numerous check boxes in this window (colored red) and I think it is obvious what they are. They turn different options on and off. 3ds Max has many checkboxes. They can sometimes cause problems when accidently checked or unchecked
- A spinner has a number value in a window and an up and down arrow next to it (colored yellow). Clicking on the up arrow increases the value. Clicking on the down arrow decreases it. You can also type in values, if you want. To zero out a spinner, right click on it. You can also left click on a spinner and drag your mouse up or down to adjust it faster.
- Groups are usually under a rollout and are defined by a title and a dark gray box. There is one group in this window (colored magenta) and it is called the Paint Soft Selection group. It contains buttons, spinners and checkboxes that have to do with this function.

- Finally, many interface windows have tabs along the top, like this one. This one has 5 tabs - Common, Renderer, Render Elements, Raytracer and Advaced Lighting. Each one opens up a new area in the window with different functions.
The 3ds Max pogram interface contains several main areas that have different functions. There is a lot going on here. We will name and discuss some of it. But we will leave some items for later.
The big green button in the upper left-hand corner of the window is the File button. When you click it, you will get access to all the file functions, such as Open, Save, Import, Export, etc....
Just to the right of that, shaded in red, is the Quick Access Toolbar. This toolbar can be customized to contain whatever you want. But, by default, it contains New File, Open File, Save File, Undo, Redo and the very important Project Folder button, which we will discuss later in the File Management section of this page.
Continuing accross the top, also shaded in red, is the Info Center toolbar. This toolbar provides a quick and easy means for users to search the various and many help files, tutorials, announcements and updates from Autodesk. It would be worth your time to expolore this area a bit. There is a lot of useful and helpful information here.
Moving down from the top, shaded in green, is the Main Menu. Most of the functions here can be accessed from other areas in the interface. But many cannot. So, again, tale a few minutes to open each one up and take a look at what's inside.
The next area is the Main Toolbar. It is shaded in yellow. This area can be customized. But, by default, it contains many frequently used functions that are also available in the Main Menu.

On the right hand side of the interface window is a very important area called the Command Panel. It is shaded in blue. The Command Panel contains many frequently used functions. Along with the Main Toolbar, you will spend most of your time using this area. Notice that it has a row of tabs along the top. Accessing each tab changes the options in the window below. Note also that there are sometimes a row of small buttons below the tabs. Clicking on them also changes the functions. In addition, there are sometimes pulldown menus below these that can change the functions again. So, for example a typical instruction involving the Command Panel might read something like this, "In the Command Panel, under the Create Tab, access the Geometry Button and use Extended Primitves from the pulldown menu at the top. Then create a Chamfer Box in the Top viewport." Try this now and see if you can do it.
Below the Command Panel, highlighted in green are the Navigation tools. These tools allow you to move your view of the scene. You can Pan (move back and forth, up and down), Rotate and Zoom. You can also use Zoom Extents All to center all objects, or the selected object, in each viewport. There are keyboard shortcuts for mist of these And most people use these shortcuts instead. We will cover these on another section of this site.
Staying at the bottom of the window, highlighted in magenta, are the Time controls. These controls help you animate objects in 3ds Max.
The largest area of the interface is taken up by the Viewports. The default viewports are Top, Front, Left and Perspective. Clicking on each word in a viewport will bring up options for changing and configurng that viewport. Also, surrounded by a green box in each viewport, is the Viewcube. This is a navigation aid that allows you to rotate, the viewport and change it. Play wround with it to see what it does.
As we said before, there are many layers to this program and interface. The more you work with 3ds Max, the more you will learn about these different areas. We will cover each one in more detail, as needed.
When you are done constructing your scene in 3ds Max, you will need to render it. This process executes the instructions you have given the computer, through 3ds Max, and constructs a digital photograph or video of your scene. Rendering a video is a slightly different process than rendering a photo. So we will cover each process separately.
Note: For this class, you will always turn in a render of your scene, not a 3ds Max file. If the scene is animated, turn in a .mov(H264). If it is not animated, turn in a .jpg. Always render at 1280x720(720p) resolution.
The scene below is a still, non-animated scene of a file cabinet in a room. Exciting. I know. The 3ds Max file of this scene is the native file. It is useless to ayone that does not have 3ds Max and cannot be posted on the web, or used in a video in this form. In order to make it useful outside 3ds Max, we need to render it. There are multiple ways to render a scene in Max - the Render Menu, the Render button (teapot), and the keyboard shortcuts F9 and SHIFT Q. But before you do your final render, you need to set it up using the Render Setup window. To access the Render Setup, click on the Rendering item in the Main Menu.

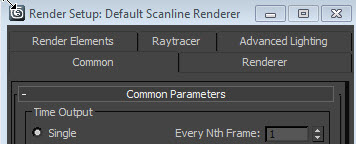
- When the Render Setup window opens, it will be in the Common tab by default.
- The first thing to do is to check and make sure that the Single radio button is selected.
- Under the Output Size group, change the width to 1280 and the height to 720. This is 720p HD resolution. The reason I ask for this is so that I can use your work in hightlight reels for the class.
- For most of our purposes, everything else can stay in default mode.
- The next thing to do is to click on the Files button, located in the Render Output group. This will open another window.

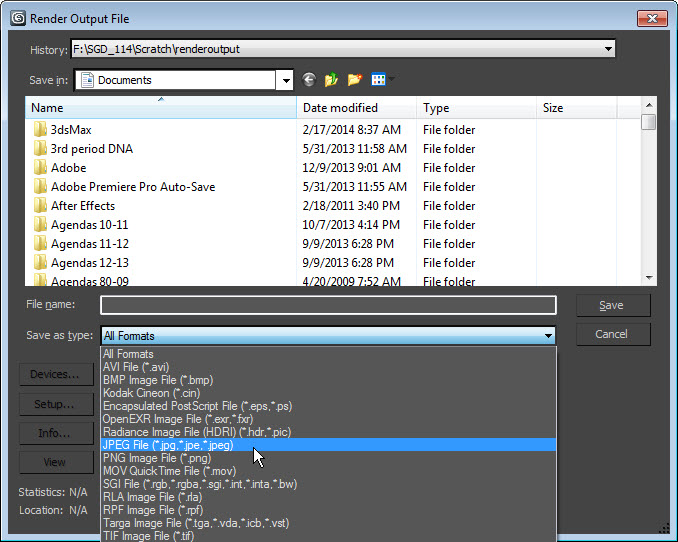
In the Render Output File window, you will need to specify a file type by using the "Save as type" pulldown menu. In this case, select JPEG (.jpg). Then type in a name for the file. Make sure it is something identifiable with the project.
After this, you need to specify a file path in the "Save in" pull-down at the top of the window. Make sure you are putting it in your documents folder, in the project folder. NEVER save anything on the desktop or in the My Pictures folder.
Finally, press "Save". After you do this, a small window with .jpg compression settings will pop up. Select Best, Large and Normal.
You have now completed setting up the render parameters for the scene. They will stay the same until you change them. You can now either close the Render Setup window, or you can press the Render button to render the scene.
When you render a still frame, using whatever method you choose, 3ds Max will produce a digital photo of your scene, like the one below. 3ds Max does not save your render yet, so that you have the opportunity to check it. Check and make sure the scene looks like you intended.
Don't worry. You're almost done! All you have to do next is press the disk icon on the left hand side of the rendered image (see picture below). This will bring up the Save Image window (same as the window from Render Setup).
You must again specify a file type (JPEG), name the file, specify a path and push Save. After this, you will have a rendered, .jpg image of your scene.
Note: For this class, you will always turn in a render of your scene, not a 3ds Max file. If the scene is animated, turn in a .mov(H264). If it is not animated, turn in a .jpg. Always render at 1280x720(720p) resolution.

When you render a video in 3ds Max, or any other CG animation program, you are essentially producing a series of stills - one for each frame in the animation. The program automatically puts them together for you, in the format you specify.
This is the basic difference between rendering a still and rendering a video. All you really have to do is tell 3ds Max how many frames you want to render and what format you want them to be.
- When the Render Setup window opens, it will still be in the Common tab by default.
- The first thing to do is to check and make sure that either the Active Time Segment (all frames) or Range radio buttons are checked. which ones you select depends on whether you want to render all frames or just a portion of the total frames.
- Under the Output Size group, change the width to 1280 and the height to 720. This is 720p HD resolution. Again, the reason I ask for this is so that I can use your work in hightlight reels for the class.
- For most of our purposes, everything else can stay in default mode.
- The next thing to do is to click on the Files button, located in the Render Output group. This will open another window.
Almost there. See I told it was pretty much the same!

After you press the Files button, the Render Output File window appears. Specify the file type - in this case, MOV (Quicktime, .mov). Name the file and specify a file path. After this, click Save.
At this point, another window, unique to Quicktime, will pop up (see below).

All you have to do here is change the Compression Type (codec = compression/decompression) from Animation to H264 and drag the Quality slider all the way to Best
When you are finished, press OK.
At this point, you will be returned to the Render Setup window. To render your video, press Render, at the bottom of the window.
Windows will pop up and your render will progress. When the render stops, you will have a Quicktime video file in the location you specified.
This is what you will turn in to me.
Note: For this class, you will always turn in a render of your scene, not a 3ds Max file. If the scene is animated, turn in a .mov(H264). If it is not animated, turn in a .jpg. Always render at 1280x720(720p) resolution.

When rendering a video, you may want to consider rendering one frame at a time. This approach is acutally preferrable in many cases for a couple of reasons.
- If your render is taking a long time (sometimes more than a class period, for example), you can easily spread the job out over several days.
- If your render crashes in the middle of the job, you can pick up where you left off, without having to start over.
- You can render videos in different formats and resolutions easily and quickly
- You will have ready made stills for a variety of purposes, since you are rendering a series of stills with which to assemble your video later.
Rendering frame by frame involves rendering one still picture for each frame in the animation and then assembling them later using either video post in 3ds Max or a video editing program, such as Premiere Pro, After Effects or Final Cut Pro.
In order to render one frame at a time, start by creating a folder to contain the frames, since there will likely be very many of them. Create the folder in the project folder, inside the render output folder, or in whatever folder structure you are working with.
Next, set up the render the same as you would for a video. BUT, this time, instead of choosing a video format, like MOV, choose a still format, such as png, tga or jpg and select the folder you created for these frames, to receive the images.
After rendering, you will have a folder with a number of still images in it, equal to the number of frames in your animation. The next step is to convert them into a video. In 3ds Max, you can do this using Video Post. You can do this in the same .max file as your animation or you can open up a new, blank .max file and do it. Go to the Render item in the Main Menu and select Video Post from the drop down menu. A new window will open up. This is the Video Post interface. The first step towards making your video is to select the Input Event button.

When the Input Event window pops up, click the Files button. Another window will pop up. In this window, navigate to the folder where you stored you frame images and slect the first one in the sequence. VERY IMPORTANT: be sure to check the Sequence check box at the bottom of the window. Click Open. Then OK in the Image Input window. You have now created an input event in Video Post. The input event uses an .ifl (Image File List) file, created by 3ds Max, when you selected the image sequence.

Next, create an output event by clicking the Output Event button in the Video Post window. This will bring up the Image Ouput window. Click the Files button.

Another window pops up. Navigate to the folder where you want the video placed. Under Save as type, choose a video format. Name the file and click save. Then click OK in the Image Output window.

The final step is the easiest one! Find and click the "Running Man" button in the Video Post window. The Execute Video Post window will pop up. Make sure the range is correct. Choose a size for your video (In this class we use 1280x720) and click Render. This will execute the input and output events you have created. When the process is finished, you will have a video in the location you specified. How cool is that?!

Good file management is a must with 3ds Max. When you build a complex scene in 3ds Max, you will be using and creating numerous files. In addition, 3ds Max will sometimes crash your computer. Shocking. I know. Therefore, it is good practice to save multiple copies of your work often. Finally, in the CG industry, collaboration is the norm. You don't want to be the person no one wants to work with, because your projects are a mess. So, it is a good idea to get into the habit of keeping your files organized and using the tools that 3ds Max has available to help you keep your work safe and easy to find.
The main tool for doing that in 3ds Max is the Project Folder. Each project you create in Max should have its own project folder. You can have many scenes and/or objects in a project (separate Max files). But they should all be in the same project folder.
An added benefit of the project folder system is that 3ds Max projects can be transferred and shared easily, since all relevant files will always be in the correct place.
When you start up 3ds Max to begin a new project, the first thing you should do is make a project folder for the project.
You can do this in two ways. You can either create a new folder for your project first, using the Windows explorer window and the New Folder function. Or, you can create one when you perform the project folder sync in Max.
Either way, you have to use the Project Folder button located in the Quick Access Toolbar, located in the top left corner of the interface window.
When you do this, the Project Folder Browser will appear. At this point, you can either select the project folder you created in the documents window or you can press the Make New Folder button to create a project folder. If you make a new folder here, be sure to name it before closing the Project Folder Browser.
When you press OK and close this window, you will have created and/or synced to a new project folder for your project. Inside this folder, 3ds Max will create several folders that it uses automatically to manage all the files that make up your project.


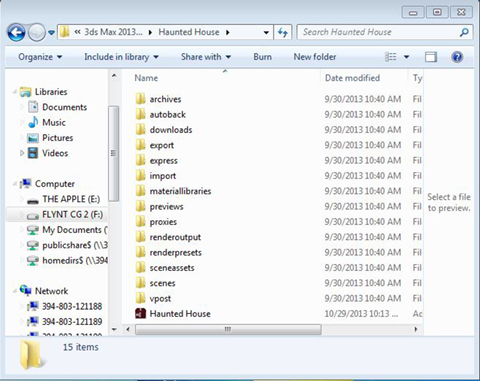
If you open the new project folder you created, you will see many new folders. Each of these folders has its own purpose and some have more than one folder inside them.
3ds Max will now save all your scene files to the scenes folder. All material libraries that you save will automatically go into the material libraries folder. Any renders you make will fo into the render output folder.
Also, very importantly, 3ds Max automatically saves backup copies of your project in the background while you are working. These copies will be saved into the autoback folder inside the current synched project folder.
WARNING!
You must create a new project folder for each new project and sync to it. Otherwise, 3ds Max will overwrite all autobackups for the previous project. This could cause a problem if you end up needing those files later.
Keyboard Shortcuts
Keyboard shortcuts are a great way to increase your productivity and avoid carpal tunnel in your mouse hand. Moving your mouse to each and every button and menu item needed every time will become tiresome, I promise. If you find yourself going to the same few buttons and/or menu items over and over again, consider using a shortcut.
Below are many often used shrotcuts. This is not a complete list, but it will certainly get you started.
| Basic | |
| CTRL + Z | Undo |
| CTRL + S | Save |
| CTRL + C | Copy |
| CTRL + V | Paste |
| Selection | |
| CTRL + LMB | Add to selection |
| ALT + LMB | Subtract from Selection |
| SHIFT + Move, Rotate or Scale | Clone an object |
| CTRL + A | Select All |
| CTRL + I | Invert Selection |
| W | Select and Move Tool |
| E | Select and Rotate Tool |
| R | Select and Scale Tool |
| CTRL + I | Invert Selection |
| Spacebar | Lock Selection |
| CTRL + I | Invert Selection |
| Main UI | |
| X | Toggle gizmo on and off |
| CTRL + X | Toggle Expert Mode |
| S | Toggle Snaps on and off |
| A | Toggle Angle Snaps on and off |
| G | Toggle viewport grid on and off |
| M | Material Editor |
| Alt + W | Maximize Viewport toggle |
| F, L, T, P and C | Change view to: Front, Left, Top, Perspective and Camera. |
| Shift + Q | Render |
| F9 | Render current frame |
| F3 | Wireframe toggle |
| F4 | Show Edges |
| Editable Poly | |
| 1 | Vertex Mode |
| 2 | Edge Mode |
| 3 | Border Mode |
| 4 | Polygon Mode |
| 5 | Element Mode |
| F2 | Shaded Selected Polygons |
| ALT + L | Select Edge Loop |
| ALT + R | Select Edge Ring |
| ALT + H | Hide Selection |
| ALT + U | Unhide All |
| Navigation | |
| MMB | Pan |
| ALT + MMB | Rotate Scene |
| CTRL + ALT + MMB | Zoom |
| Miscellaneous | |
| CTRL + C | Create Camera from view |
| Shift + 4 | Spot/Directional Light View |
| - | Transform gizmo size down |
| + | Transform gizmo size up |
The Material Editor
The Material Editor in 3ds Max 2014, defaults to a new version called the Slate Material Editor. Older versions of 3ds Max used what is called the Compact Material Editor exclusively. Later versions offered the Slate Editor but the default mode was Compact.
To switch back to the Compact Material Editor, which is used in most of our tutorials, simply open the Material Editor, go to Modes and select Compact. The Material Editor will now look like the one used in our tutorials.
To switch back, follow the same procedure from the Compact Material Editor
